|
One question we get a lot is "How much clay do I need to make ____?" Alternately, there is also the "How many mugs can I make with a box of clay?" version. It's something everyone asks at some point in their clay explorations, usually more than once! While meandering through the archives of Ceramic Arts Daily, I came across this great diagram by Robin Ouellette and wanted to share! 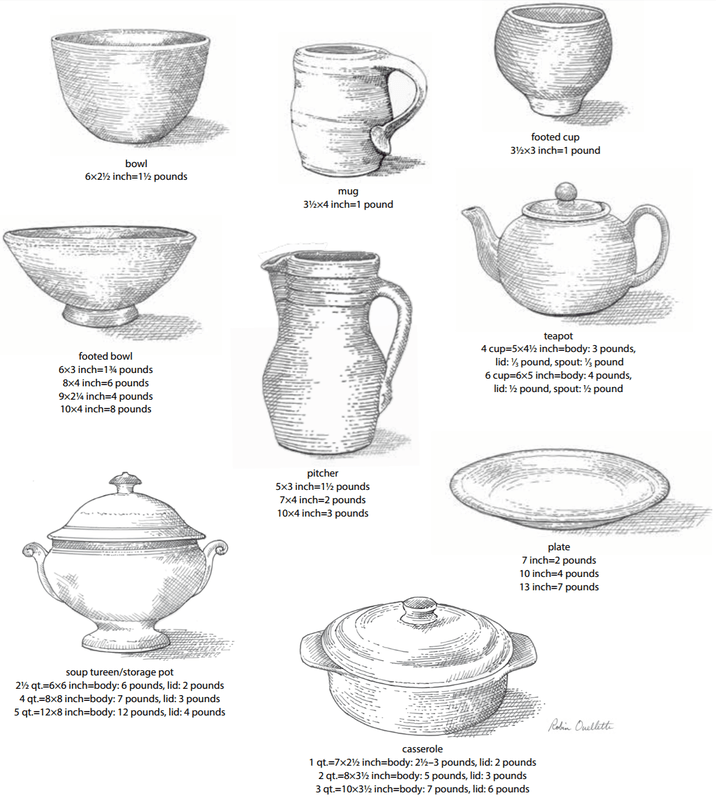 If that is too small to read, here's a charted version: 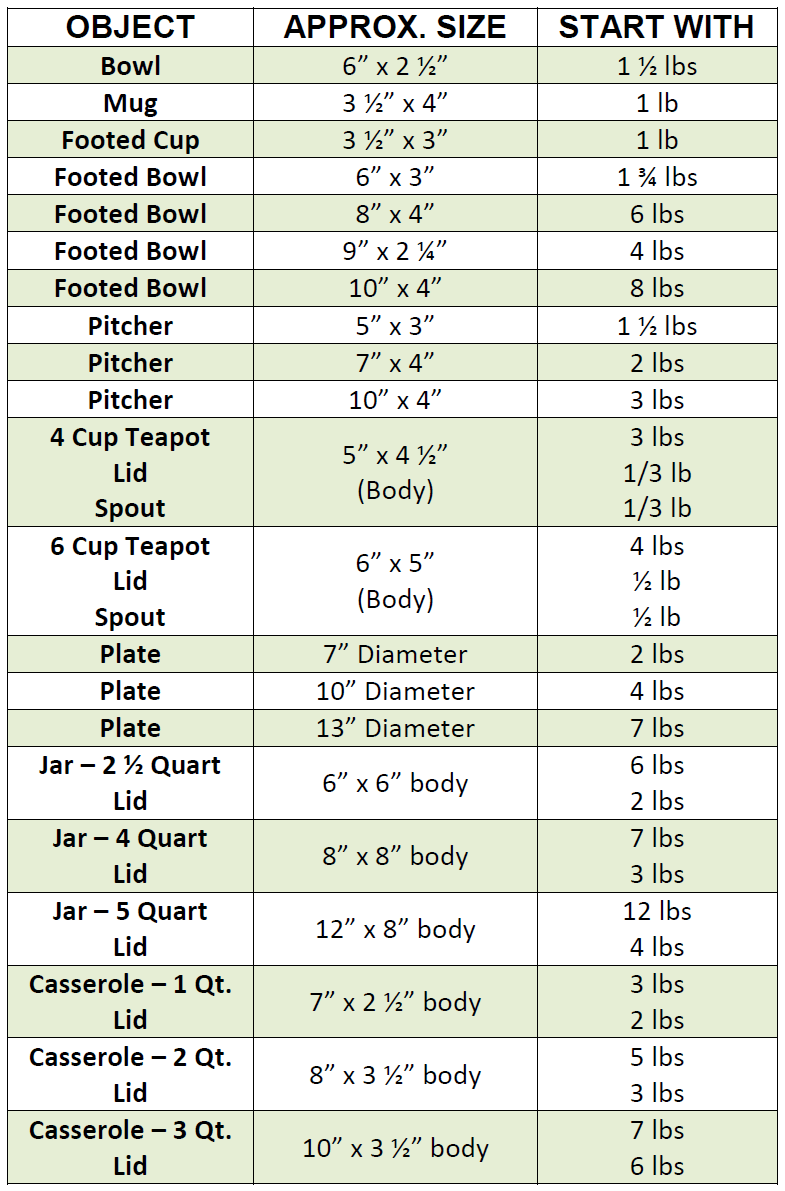 This is obviously just a general guide, and you may need to use more or less clay to achieve these forms. Happy potting!
0 Comments
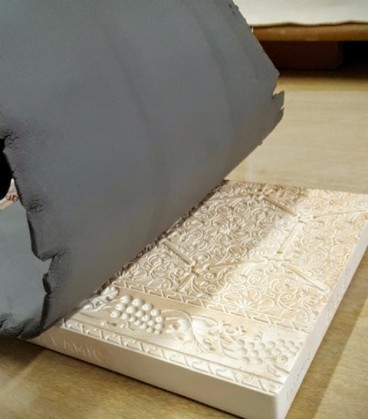
I can't believe it's already November, but here we are. If you plan on making some of your gifts this holiday season, it's time to get in gear! Between making, drying, firing, glazing, and re-firing, there is a pretty substantial lead time on any clay project, so don't procrastinate! Get ahead of the holiday-gift game and start today. We love these little textured dishes because they are easy to make, look great, don't require many tools, and the technique can be adapted to make almost any form! 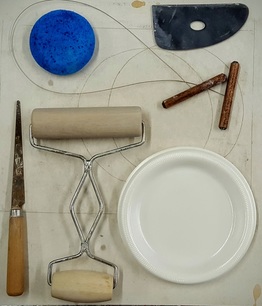 Supplies:
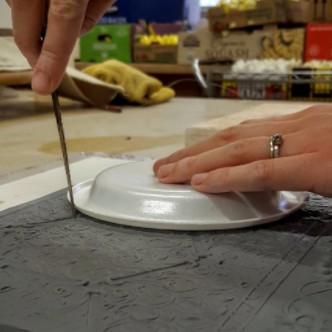
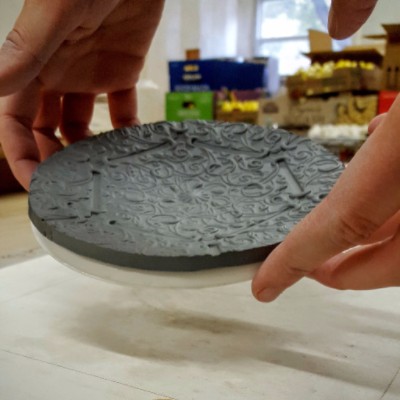
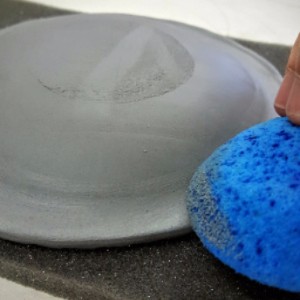
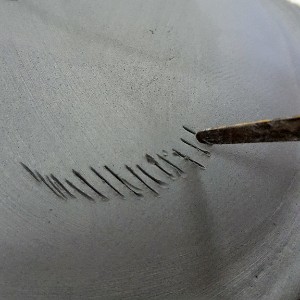
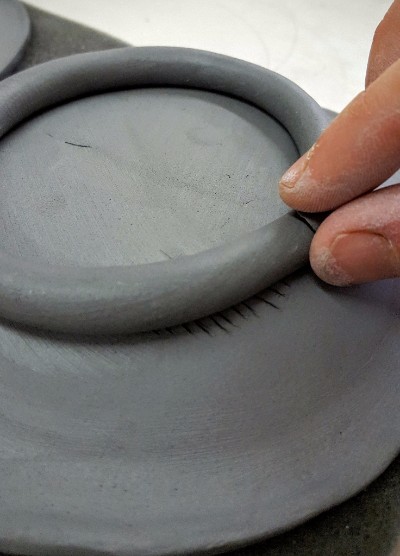
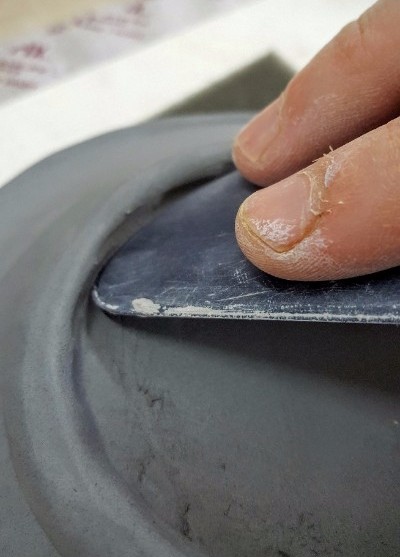
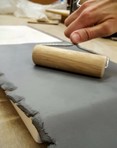 Using your rolling pin or hand roller, press the clay onto the texture slab with moderate pressure. Make sure to roll in multiple directions, and all the way to the edge of the mold. You can gently lift one side of your clay slab to check and see if the design is imprinted. If it is faint, continue rolling with increased pressure until you get a good impression. Carefully remove the slab from the mold and lay it flat with the textured side up. Using your paper plate as a template, cut out the shape of your dish using the fettling knife or a similar cutting tool (you can even use a butter knife in a pinch). Turn the paper plate right-side-up and set your round slab into the center. Lift the plate a few inches off the table and let it drop a few times. This will help the clay settle into the form and take the shape of the plate. If the paper plates you have are not very sturdy, you can double- or triple-layer them to help support the clay. Using your thumb, gently press on the sharp edge of the rim to soften it. Continue this soft pinching motion all around the rim. Don't worry if it isn't perfect, there will be more opportunities to refine later. Let the plate set up for about an hour, or until it becomes soft leather-hard. When the plate has set up to the soft leather-hard stage, it can support its own weight without the paper plate form. Once your piece is out of the paper form, gently turn it over and set it on a bit of foam to prevent damage to the texture. Keep in mind that this is a dessert-sized plate, and for larger forms like a dinner plate, you will need to add a support underneath once you remove the paper plate form and flip the clay piece over. I find that sponges work well for this. Roll out a thin coil and tap one side to make it flat. Score the flat side of the coil and the bottom of your plate on the "shoulder", where the flat bottom starts to turn into the rim. Brush a bit of water, slip, or vinegar onto the score marks and connect the foot to the plate. Using a rib, blend the coil onto the bottom of the plate on both the inside and outside of the foot. Make sure to use one hand to support the underside of the plate opposite where you are pressing the rib, keeping the foam in between to act as a buffer and protect your texture. Once the foot is blended, you can go back with your sponge and refine the foot and rim. Try not to use too much water, as it will soften the clay again and cause distortion to the shape. Last but not least, once the foot has set up a bit (about 30 minutes), flip your plate over and give the foot a few gentle taps on a flat surface. This will level out the foot so the plate doesn't wobble. 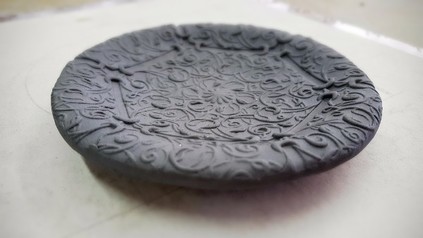 Tada! You just made an awesome appetizer plate/ring dish/catch-all/soap dish/you-name-it! Aunt Rosie will be in raptures! Bonus tip: Choose a glaze that accentuates texture, like Mayco'sElements Glazes or Foundations Sheer Glazes! Most of us at some point will have to ship a ceramic piece, whether it be for a gallery, online customer, or Aunt Bernadette's birthday. After spending hours making a beautiful cup, plate, sculpture, etc., the last thing we want is to hear that the precious cargo arrived in shards! Amaco published this great video that covers the basics of packing pots for shipping: A Few More Tips
Why and How to Make Your Own Making pots takes time. Decorating them takes even more in some cases. One thing that is always at the forefront of a potter's mind is the moisture state of the piece. If it's too dry, the carving tool will leave ragged edges. If it's too wet, the clay will stick to the tool and smear. Timing that handle attachment or that mishima scraping is a major part of our art that takes practice and patience to perfect. Let's face it, though: we all have busy lives, and sometimes, time constraints don't allow us to wait for just the right moment. Luckily, there is an easy solution that makes a great addition to your studio: a damp box. A damp box is a humid container in which to store in-progress claywork. You are creating a makeshift version of this every time you put a plastic bag over an incomplete piece. The advantange of a damp box is that you can do this without the hassle of the plastic bag, or the potential surface marring it can cause. Now, you could pay hundreds (or even thousands) of dollars for a fancy damp cabinet from a manufacturer, but I'm a broke twenty-something who pinches every penny until they beg for mercy. Why pay all that money for something you can achieve with $20 and 30 minutes of your time?
Once you have chosen your box, you will need some plaster. I prefer a medium-density plaster such as Puritan Pottery plaster or #1 Casting plaster (both are available at Armadillo Clay). You will want to weigh out about 10 lbs of plaster for a 30-40 gallon box. Smaller boxes will use less plaster. Assuming you are using one of the two plaster choices I recommended, you will need about 6 1/2 pints of water to make up that 10 lbs of dry plaster. In a clean bucket, measure out your water, then add in the dry plaster and mix for about 5 minutes. Make sure to wear a respirator! Once your plaster is well-mixed, carefully pour it into your box until you have about an inch depth of plaster in the bottom. Too much, and the box will be very heavy. Too little, and your plaster layer will be prone to breaking when you move the box around. Let the plaster set overnight, lid off.
Your damp box is ready to use! Make sure to leave the lid off when it is not in use, to avoid mold growth. If you do get some mold growing, you can spray the plaster slab with a bit of well-diluted bleach. To recharge your damp box, just pour some fresh water onto the plaster slab. I prefer to have a layer between the plaster and my pots, so I cut some old Orton Cone box liners to make a soft sponge layer on top of the plaster. Once you have a damp box, you'll wonder why you didn't make one years ago! If you've ever tried handbuilding a piece, particularly one with a large flat surface such as a platter or decorative tile, you've most likely encountered issues with warping. You smooth and carve and sand and perfect, and then it comes out of the bisque with that dream-crushing wobble. Don't worry, you're not alone. Most people underestimate the difficulty of handbuilding, particularly flat pieces like tiles and plates. In reality, there are a plethora of nuances to making a successful handbuilt plate. Here are a few tried-and-true tips to help you avoid that heartbreaking warp:
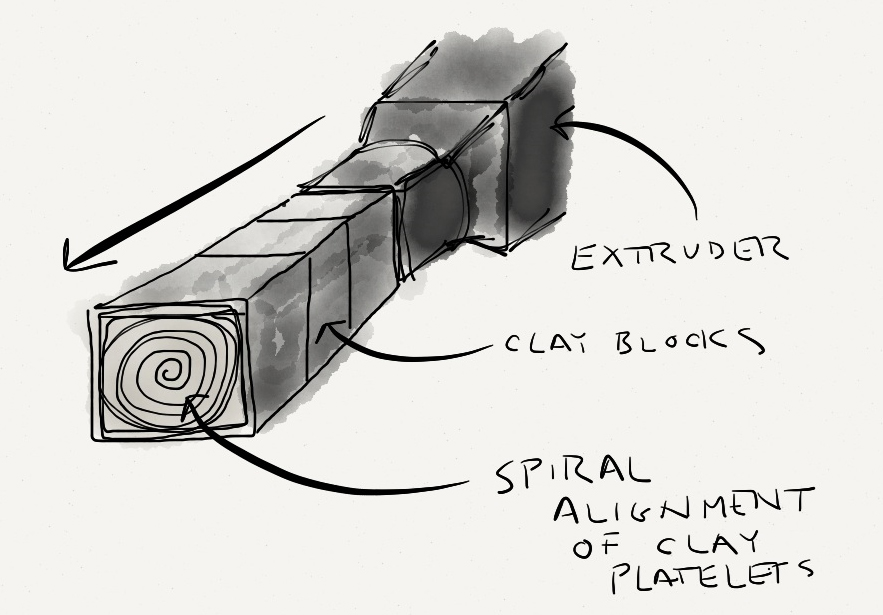
The spiral usually ends up facing up toward the opening of the bag, so when you just slice a layer off the top, you are taking a whole cross-section of that spiral with you. Not good! The clay particles are aligned differently in the center of this slab than they are at the edge. To avoid starting off on the wrong foot, take your clay pug out of the bag and cut your slice off the side of the pug. This will give you a relatively even section of clay with which to begin preparing your slab.
Now that you have a nice piece of clay, stretch and roll out your slab gradually(don't smash it into shape all at once!), flipping and turning it as you go. This will help align the particles on both sides of the slab evenly. 2. Handle With Care As you work, try to keep in mind how you are handling the soft slab. Anytime you need to move it, ask yourself: "Do I really need to pick up the slab, or could I use another board to flip/adjust it instead?" Use boards as often as possible to sandwich the slab and flip it, rather than picking it up with your hands. This avoids stretching the slab, which can translate into warping as it dries. Sometimes there's no other way but to just pick it up, though, so when you do, make sure to go slow and splay your fingers to give the slab as much support as possible. Once the slab sets into the leather-hard stages, this stretching risk is all but eliminated. Once the piece is finished, dry it with just as much care! Slow and steady wins the race. Fast, uneven drying encourages warping. 3. Don't Stress, Compress! While this is more of a general rule of handbuilding, it sort-of applies to warping, so I've decided to mention it. Make sure to compress your edges and attachment seams! The edges of the slab get weaker as you work and move the slab around, so it is important to go back and re-compress those edges to ensure sturdy attachments and strong rims. Clay moves as it dries, and without proper compression on your attachments, those joined slabs will want to warp away from each other, creating cracks. 4. Put a Foot On It A plate with a foot ring is much less likely to warp than one without. The reason for this is the same as basic construction fundamentals: A broad plane is much stronger with an underlying support brace. The foot ring adds this support and helps stabilize the wide flat span of slab. 5. Don't Wait, Weight! Weights are a very helpful tool for handbuilders. Most common are small sandbags that can be made at home with old socks and a Ziploc sandwich bag. Fill the sandwich bag with a pound or two of sand, double bag if desired, and place inside an old athletic sock. Tie off the end and voila! Instant high-tech handbuilding tool. These sandbag weights are perfect for plates, applying just enough even pressure to discourage warping as the plate dries. As soon as the plate is soft leather-hard, these weights can be applied. Don't overdo it, though. One or two sandbags usually does the trick. I recommend putting a soft liner between the sandbags and your piece, however, as the texture from the sock can sometimes be left behind. I use a thin piece of foam (like the ones that line Orton cone boxes!) to preserve my plates' surface. For tiles and other flat pieces, sandwich them between sheets of drywall and let them dry slowly, flipping every day or so. Make sure to wait until the pieces are soft leather-hard before sandwiching, to avoid damaging any decoration on the surface. I also use this technique on larger plates and platters, to help keep the rim level as it dries. At the end of the day, as with anything clay-related, there is no shortcut to experience. Some levels of understanding can only be achieved through trial and error. Don't get discouraged! Keep making, keep learning! Traditional methods to Beat the Heat
 Ollas are traditionally made as a bulbous bottle-shaped form with a narrow neck that is capped by a plug or lid to prevent critters and debris from getting inside the pot. There is no set rule on an olla's shape, however, and you can get creative with your design! The size of the olla will depend on many factors: available space, type of soil, sun exposure, number of plants, etc. Your ollas can be as functional or sculptural as you want. Check out this clever face design (left) from Dripping Springs Ollas! They are very easy to install (just dig a hole!). The best time to put them in is when you are first planting a bed, however if you are very careful, it is possible to introduce an olla to an established garden. These simple pots can be made by anyone, and can be very helpful for any gardener! Let's make an olla!Start by choosing an appropriate clay body to make the pot. We recommend using Cinco Rojo, Armadillo's mid-fire red stoneware clay that is very porous when fired to cone 04. You may also use other clay bodies such as stonewares, as long as you only fire them to cone 04. Though traditional ollas are made from terracotta clay, our Longhorn Red loses most of its porosity at cone 04, so we recommend the Cinco Rojo for best results.
Time to make your olla! Important attributes to include in your design: - A good-sized well (the belly of the vessel) to hold water. The larger the well, the less frequently you have to fill it! - A narrow neck. This minimizes the surface footprint of the olla, leaving more room for plants. Just make sure you can still easily fill it up! - A lid. The style of lid makes little difference, so long as it fits well. If you cannot make a lid, or if the lid you made doesn't work out, you can always use a rubber plug, snug-fitting rock, or other means to seal off the mouth of the jar. Let dry and fire to cone 04. Glazing Traditional ollas are left unglazed, but contemporary makers have found that by glazing just the neck, mouth, and lid, you can significantly reduce the water lost to aspiration/evaporation through these exposed, above-ground sections. The well of the pot that remains beneath the soil must be left unglazed (inside and out!) to allow the water to pass through the pot into the soil. Apply a low-fire glaze and fire to cone 06, install in your garden, and fill with water. Now you can sit back and enjoy your summer, with less watering and happier plants! Note: Make sure to check the water level of your olla daily for the first few weeks, until you get a feel for how frequently you need to fill it! Show us your handmade ollas and share tips for other gardening potters on ourFacebook page! Artist Feature: Renee LoPrestiWhen I first met Renee LoPresti, she was showing her wares on the front porch of the studio at Eye of the Dog's Holiday Show last fall. The colorful, graphic nature of her pots caught my eye, and we got to chatting. A relatively new transplant to Texas, Renee was both humble and enthusiastic, happy to 'talk shop' about the intricacies of working with stencils and colored slips. In the months since then, her work has evolved and captured the spotlight, popping up in galleries from Louisiana to Colorado, and delighting attendants of this spring's Dirt Dauber Festival. 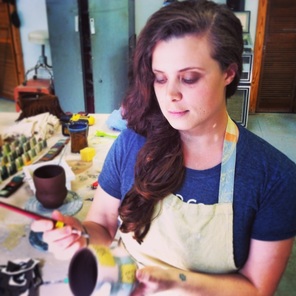 A BFA graduate of Alfred University, Renee first moved to the Lone Star State back in 2010 to take a glassblowing position at Wimberley Glassworks. A bit of coincidence and a twist of fate eventually landed her squarely at Eye of the Dog Art Center in San Marcos, where she has taken up as an artist-in-residence for the past year. No stranger to dedication, she can often be found hard at work in the studio in the early hours of the morning. I recently had the opportunity to take a workshop taught by Renee, and obtained a glimpse of the playful-yet-laborious process she puts into every piece. Working with a combination of slips and underglazes atop Armadillo's Cinco Rojo stoneware, each pot is painstakingly layered with blocks of color, incised with tools, and tediously patterned with tiny dots squeezed from an applicator bottle. At the end comes the "big reveal", when the paper and vinyl stencils are carefully removed to unveil the bold, dynamic focal points of the piece. Renee lists architecture and vintage objects alongside Meredith Host and Kristen Kieffer on her well-rounded index of influences. Her passion for design pushes her to make work that is both communicative and accessible. So far this year, Renee has had her work featured in eight different exhibitions, and she shows no signs of slowing down. With future plans to pursue both teaching and a potential residency program, for now she is focused on making. The next place to find her pots will be in Lubbock on June 11th and 12th for the Wine and Clay festival at the Llano Estacado Winery. This October, she will make her debut at the renowned Texas Clay Festival in Gruene. In the meantime, you can follow her work on Instagram at @staygoldceramics
|