|
If you've ever tried handbuilding a piece, particularly one with a large flat surface such as a platter or decorative tile, you've most likely encountered issues with warping. You smooth and carve and sand and perfect, and then it comes out of the bisque with that dream-crushing wobble. Don't worry, you're not alone. Most people underestimate the difficulty of handbuilding, particularly flat pieces like tiles and plates. In reality, there are a plethora of nuances to making a successful handbuilt plate. Here are a few tried-and-true tips to help you avoid that heartbreaking warp:
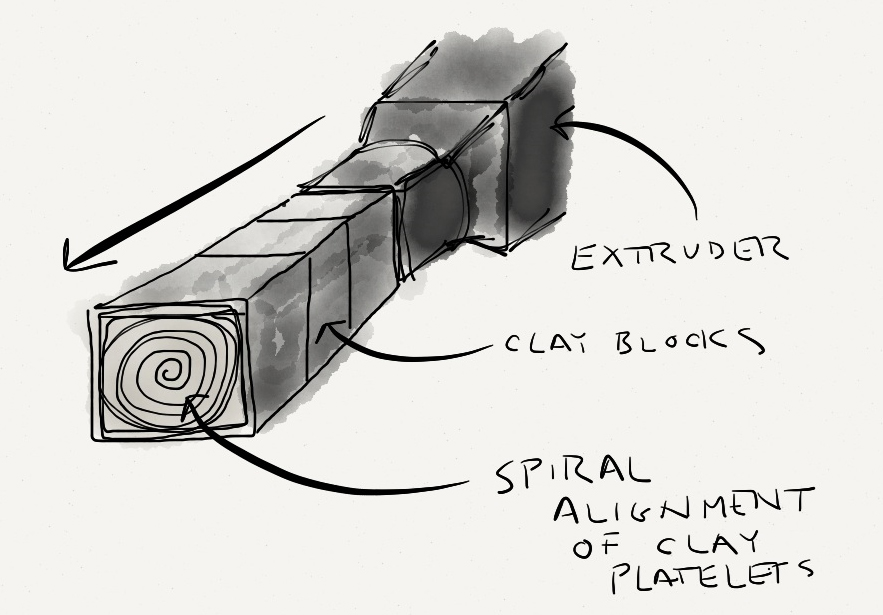
The spiral usually ends up facing up toward the opening of the bag, so when you just slice a layer off the top, you are taking a whole cross-section of that spiral with you. Not good! The clay particles are aligned differently in the center of this slab than they are at the edge. To avoid starting off on the wrong foot, take your clay pug out of the bag and cut your slice off the side of the pug. This will give you a relatively even section of clay with which to begin preparing your slab.
Now that you have a nice piece of clay, stretch and roll out your slab gradually(don't smash it into shape all at once!), flipping and turning it as you go. This will help align the particles on both sides of the slab evenly. 2. Handle With Care As you work, try to keep in mind how you are handling the soft slab. Anytime you need to move it, ask yourself: "Do I really need to pick up the slab, or could I use another board to flip/adjust it instead?" Use boards as often as possible to sandwich the slab and flip it, rather than picking it up with your hands. This avoids stretching the slab, which can translate into warping as it dries. Sometimes there's no other way but to just pick it up, though, so when you do, make sure to go slow and splay your fingers to give the slab as much support as possible. Once the slab sets into the leather-hard stages, this stretching risk is all but eliminated. Once the piece is finished, dry it with just as much care! Slow and steady wins the race. Fast, uneven drying encourages warping. 3. Don't Stress, Compress! While this is more of a general rule of handbuilding, it sort-of applies to warping, so I've decided to mention it. Make sure to compress your edges and attachment seams! The edges of the slab get weaker as you work and move the slab around, so it is important to go back and re-compress those edges to ensure sturdy attachments and strong rims. Clay moves as it dries, and without proper compression on your attachments, those joined slabs will want to warp away from each other, creating cracks. 4. Put a Foot On It A plate with a foot ring is much less likely to warp than one without. The reason for this is the same as basic construction fundamentals: A broad plane is much stronger with an underlying support brace. The foot ring adds this support and helps stabilize the wide flat span of slab. 5. Don't Wait, Weight! Weights are a very helpful tool for handbuilders. Most common are small sandbags that can be made at home with old socks and a Ziploc sandwich bag. Fill the sandwich bag with a pound or two of sand, double bag if desired, and place inside an old athletic sock. Tie off the end and voila! Instant high-tech handbuilding tool. These sandbag weights are perfect for plates, applying just enough even pressure to discourage warping as the plate dries. As soon as the plate is soft leather-hard, these weights can be applied. Don't overdo it, though. One or two sandbags usually does the trick. I recommend putting a soft liner between the sandbags and your piece, however, as the texture from the sock can sometimes be left behind. I use a thin piece of foam (like the ones that line Orton cone boxes!) to preserve my plates' surface. For tiles and other flat pieces, sandwich them between sheets of drywall and let them dry slowly, flipping every day or so. Make sure to wait until the pieces are soft leather-hard before sandwiching, to avoid damaging any decoration on the surface. I also use this technique on larger plates and platters, to help keep the rim level as it dries. At the end of the day, as with anything clay-related, there is no shortcut to experience. Some levels of understanding can only be achieved through trial and error. Don't get discouraged! Keep making, keep learning!
5 Comments
4/19/2021 01:17:26 pm
It's great that this article explains that sandbags are a common method used by builders as weights. My cousin wanted to fix some warping that he noticed on his siding in the back of his home. I'll let him know that sandbags can work so he can go online to research his options to find ones that fit the weight and dimensions he needs to fix the area.
LaLinda
5/15/2021 09:24:02 pm
Can ziploc bags of water to the same? It is free and readily available where I would have buy sand.
Melissa
5/17/2021 06:34:50 am
Yes, you certainly could! You'd just want to be careful that your bags have no holes, so they don't leak water onto your piece.
Shari
1/20/2022 05:09:25 am
I've done that before, and it works really well! Leave a Reply. |