ARMADILLO CLAY AND SUPPLIES
  • HOME
  • Clay
    • Low-Fire (04-06)
    • Mid-Fire (5-6)
    • High-Fire (9-12)
    • Non-Fired Clay
    • Casting Slip
  • Glazes
    • Underglazes
    • Low-Fire (04-06)
    • Mid-Fire (5-6)
    • Lusters (017-020)
    • Non-Fired Products
  • Dry Materials
    • Chemicals
    • Plaster
    • Mason Stains
  • Tools
  • Supplies
  • Equipment
    • Pottery Wheels
    • Ceramic Kilns
    • Kiln Parts
    • Kiln Furniture
    • Slabrollers
    • Extruders
    • Carts and Cabinets
    • Pugmills
  • Molds
  • Bisqueware
  • Books
  • Glass
    • Glass Sale Information
  • Services
    • Firing Services
    • Kiln and Wheel Repair
    • Custom Clay
    • Other Services
  • Gift Cards
  • Learning Center
  • More
    • About Us
    • Classifieds
    • COVID-19 INFO
    • Artist Links
  • Ordering Info

Coloring Clay

3/1/2018

0 Comments


The Limitless Possibilities of Mason Stains

​At the back of the showroom at Armadillo Clay, there lives a rack of small packages of Mason Stains. The rainbow of powders is eye-catching, but what are they even for? Though they draw many a shopper's eye, their uses can be somewhat of a mystery.

​So what are they? Mason Stains are specially formulated combinations of colorants that create specific hues. For example, #6371 Dark Teal is made up of aluminum, cobalt, and chromium. The resulting combo-colorant is a deep, rich, ocean teal that is powerful in small amounts.

But how do you use them? Mason Stains can be used in a variety of ways! Because they are colorants, they are very flexible in their applications. Here are the four most common uses:
Picture
Picture
In Clay
Wedge stain into your clay to make it whatever color you want! White clay works better as a base, and will help keep your stain color brighter. Wear gloves to avoid staining your hands! Pro Tip: Mix your stain with a little water, and then add it to your clay to make the color distribute faster and more evenly when wedging.
​

Photo from Ceramic Arts Daily and Naomi Lindenfeld
Picture
In Slip
Just like your clay, you can dye your casting and surface slips with mason stains to get custom colors! These colored slips can then be used for marbling, surface decoration, carving, and more. You can also use it for colorful sgraffito and mishima!
Picture
​In Washes
Add your stain of choice to some water, and a bit of Frit or Gerstley Borate as a binder, and you've got a brightly colored ceramic wash you can use in the same way you would use an iron oxide wash! These can also be used to do photocopy transfers.
Picture
In Glaze
If you have dabbled in glaze mixing, this one will come as no surprise to you. If not, don't worry. You can add mason stains to almost any clear or white base glaze to make it your own custom color! As with any glaze formulation, this process requires some testing to ensure a good glaze fit, and avoid undesirable surface defects. Further reading is encouraged when pursuing this application:
John Britt article in Ceramic Arts Daily
DigitalFire article on formulating and trouble-shooting
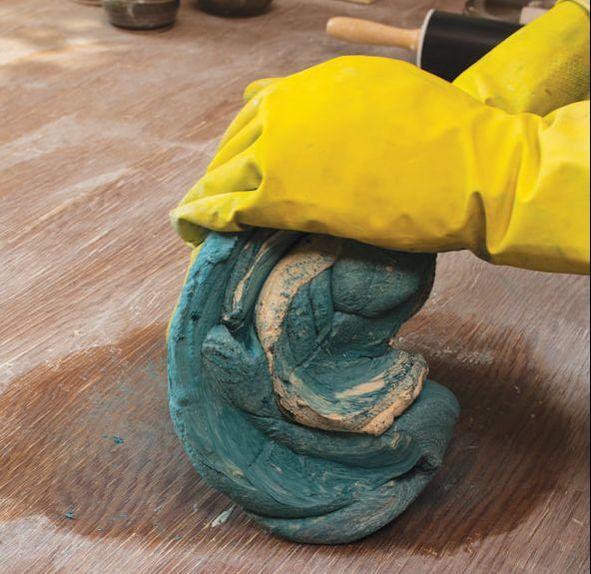
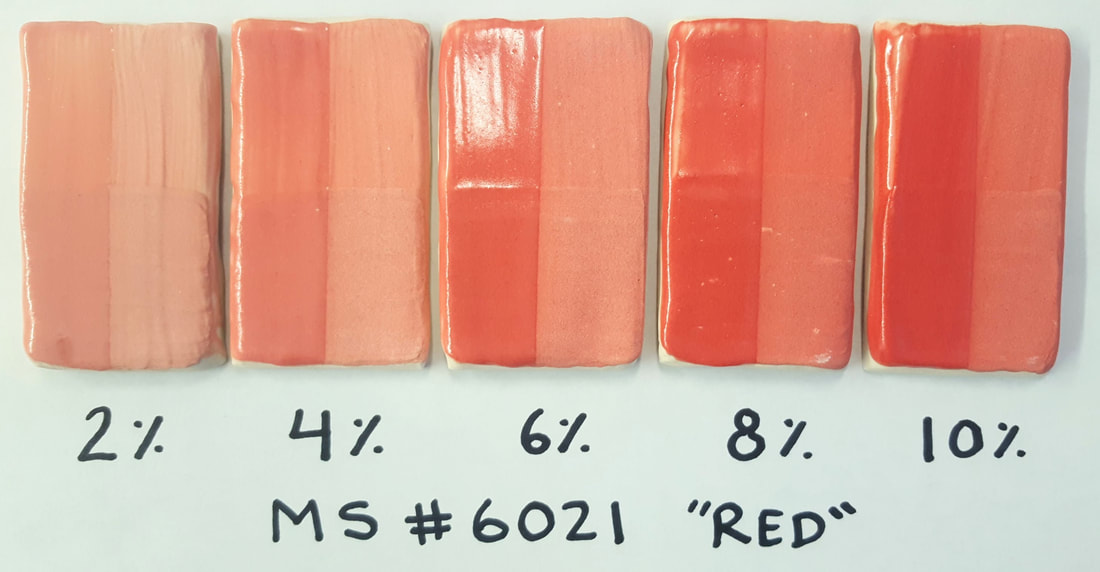
At the end of the day, using mason stains requires a bit of testing, no matter what application you are pursuing (some less than others). Each different stain has its own properties, and some colors are more powerful than others. You may only need 2% (by dry weight) of Sage Gray, but 15% of Titanium Yellow to achieve the same level of saturation for each color. And those are just slip colorant percentages for cone 5/6. If you want to make a Titanium Yellow glaze, your percentages will be different. If you want to make a low-fire slip, again, your percentages will be different. With so many variables in the mix, it is important to take the time to test!

Testing Stains in Slip

Let's get down to the nitty-gritty of how to go about testing those colors to hone in on your target hue. We're going to explore this process through an exercise of testing one stain color in various concentrations in a decorative slip. This will provide a basic understanding of the process, which you can then build upon with other testing methods.
​​
Protect your lungs! Anytime you are working with dry materials, you should wear a properly rated and well-fitting respirator!

​Step 1: Establish Your Base

To begin, we need to identify a base slip formula. There are thousands of formulas out in the world, in books and online, so do some hunting and choose one that has a good amount of community feedback. You will want to find a white or off-white slip that is intended for your firing range. For surface slips, you will need to consider the clay body onto which the slip will be applied. Choose a stoneware slip to apply to a stoneware body, a porcelain slip to apply to a porcelain body, etc. This will help match up the shrinkage rates of the two bodies and help them fit together better, minimizing cracking. Your base recipe should add up to 100, and the colorant (Mason Stain) will be in addition to that. It's a good idea to test a few different slip formulas on your clay body before committing to one and moving forward to the next step. If all else fails, you can save your clay scraps and let them dry out. Pulverize them into a powder to get your dry slip.

Step 2: Choose a Color

It's tempting to go hog-wild and want to test every color at once, but do yourself a favor and just pick one. You can come back and repeat this process again and again. Sticking with one color at a time helps avoid mistakes, especially when you are first starting out.

Step 3: Prepare Test Batches

​Decide how many different increments of the Mason Stain you want to test. I'd recommend at least 5 to give yourself a good amount of data and allow for a wider range. For the sake of this exercise, we'll stick to 5. We need to make up 5 separate mini-batches of our chosen base slip. We don't need much for each test, so 100 grams should be plenty. We will be working at a very small scale, so precision is crucial. Make sure you have an accurate gram scale on hand. Measure out your 5 batches of dry slip in 5 separate containers.
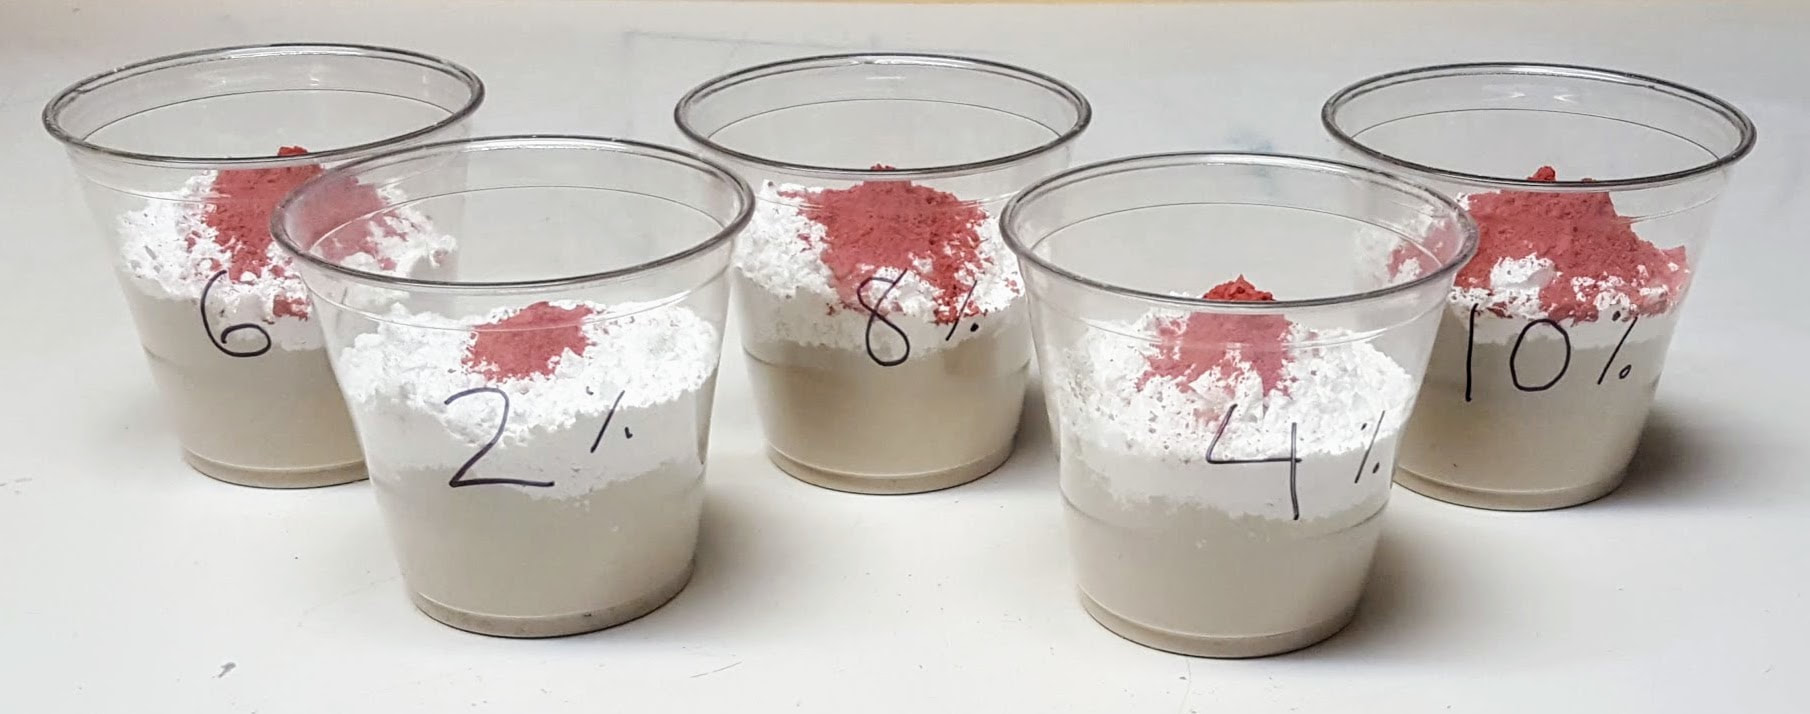
Picture

Step 4: Add Mason Stain

Now that you have 5 containers of dry slip prepared, it's time to add the colorant. Decide ahead of time what percentages you are testing and mark your containers and your test tiles. For this exercise, we're going to test the following percentages: 2%, 4%, 6%, 8%, and 10%. This is a reasonable range for most Mason Stains, however there are some that require higher percentages. Carefully measure your stain of choice and add them to your base batches. If you have 100 gram batches, this means you would add 2 grams of stain for 2%, 4 grams of stain for 4%, and so on. If you are mixing larger batches, calculate the appropriate grams for each batch. Carefully stir each batch to combine the dry ingredients.

Step 5: Slaking and Mixing

Add just enough hot water to each batch to completely cover the dry materials. Wait a few minutes for the water to make it's way down through the dry powder, stir gently, then add more water if needed to cover the dry ingredients again. It's best to cover your batches and let them slake for at least a few hours, if not overnight. Slaking is a soaking process that gives the water sufficient time to fully saturate the dry materials. Because of the extremely fine particle sizes, this can take several hours. Using hot water rather than cold water will help expedite this process. Once the batches are properly slaked, you can mix them up. You may need to add a bit more water to achieve the correct consistency (heavy cream). Blend until smooth, then sieve with a 60 mesh screen to break up any remaining clumps of dry material. Be diligent to not cross-contaminate your test batches. Clean your mixing utensils and sieve thoroughly between each batch.

Step 6: Test Tiles
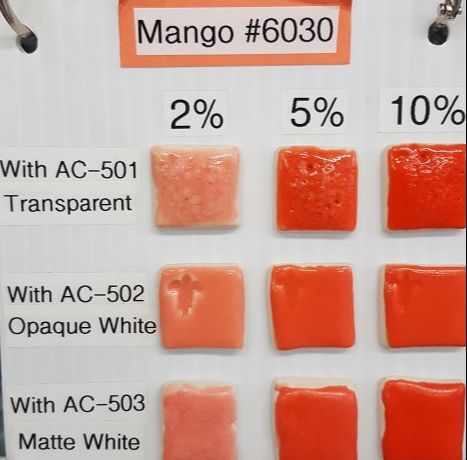
Hopefully you have planned ahead and already have some test tiles made up. If not, don't sweat it, just roll out a slab of your chosen clay body and cut out some small tiles. Make sure to stamp or scratch the percentages into the tile somewhere so you know what you're looking at when it emerges from the kiln. Apply 1-2 coats of each batch to it's matching (and well-marked) test tile, and let dry. Bisque fire, apply clear glaze to half the tile, and re-fire to maturity.
From these results, I can see that this particular red requires at least 10% saturation for a convincing red in a cone 5 slip. My next step would be to try a few higher percentages to see what deeper shades I can get, as the 10% is still a little too pink for my taste. Maybe I can get that fire-engine red at 12% or 15%. I'll just have to test and find out!
Picture

In Glaze

The process for testing Mason Stains in glaze follows the same procedures as previously discussed. Instead of dry slip batches, you will have dry glaze batches to which you will add your stain. While the initial process may be the same, there is much more room for error when formulating glazes. The chemical interactions in glaze are much more volatile than in slip, so there is a decent possibility you will run into some glaze defects along the road. Working through these issues by adjusting your recipe will take time, but you will be rewarded with a custom glaze that is all your own. Additional reading is highly recommended when pursuing glaze formulation.
John Britt article in Ceramic Arts Daily (photo below from this article)
DigitalFire article on formulating and trouble-shooting
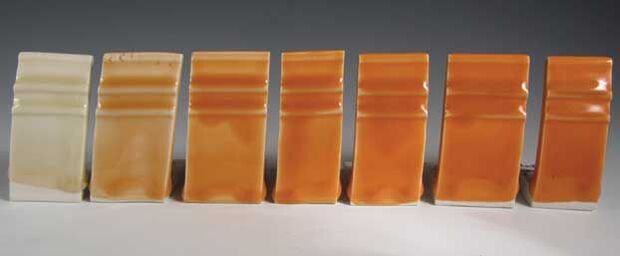
Picture
0 Comments

Your comment will be posted after it is approved.


Leave a Reply.

Hours
Mon - Fri      9am - 5pm  
Saturday     9am - Noon

FIND A DISTRIBUTOR NEAR YOU

Armadillo Clay & Supplies

3307 E. 4th Street
Austin, TX 78702

P: (512)385-7311
F: (512)385-1152

Sign up for our
monthly newsletter!

SUBSCRIBE

For quotes and product availability, please call us at (512)385-7311

  • HOME
  • Clay
    • Low-Fire (04-06)
    • Mid-Fire (5-6)
    • High-Fire (9-12)
    • Non-Fired Clay
    • Casting Slip
  • Glazes
    • Underglazes
    • Low-Fire (04-06)
    • Mid-Fire (5-6)
    • Lusters (017-020)
    • Non-Fired Products
  • Dry Materials
    • Chemicals
    • Plaster
    • Mason Stains
  • Tools
  • Supplies
  • Equipment
    • Pottery Wheels
    • Ceramic Kilns
    • Kiln Parts
    • Kiln Furniture
    • Slabrollers
    • Extruders
    • Carts and Cabinets
    • Pugmills
  • Molds
  • Bisqueware
  • Books
  • Glass
    • Glass Sale Information
  • Services
    • Firing Services
    • Kiln and Wheel Repair
    • Custom Clay
    • Other Services
  • Gift Cards
  • Learning Center
  • More
    • About Us
    • Classifieds
    • COVID-19 INFO
    • Artist Links
  • Ordering Info